Home Sweet Home

With so many of us having to stay home during the coronavirus crisis, I thought it would be good to make something celebrating our homes and to decorate my home while I can’t go out much. Of course, you could use any wording on this, or no words at all.

I started with a sheet of A4 brown card and an old photo envelope, which I stripped of the brown paper, so I just had the stiff card. I cut this down to slightly smaller than A4 and used double sided tape to attach it to the brown card. This would make it stiff enough to hang straight, without bending, when it was finished.

A4 sheet of brown card
Grey, stiff card stuck to the back of the brown card.

I had a sheet of A4 craft paper with a design of bricks and roses. I tore a thin strip from all 4 sides of this paper, always tearing towards myself, so the white of the paper showed around the edge and then sponged Pumice Stone distress ink around the edges.

I used more double sided tape to attach this to the brown card.

I tore another piece of A4 craft paper so that it ended up about 9 cm wide and distressed the edges of that with Pumice Stone as well.

I distressed a small doily with Pumice Stone, sponging it on all over the doily, sprayed it with water, dried it with a heat gun and ironed it flat. Then I cut it in half.

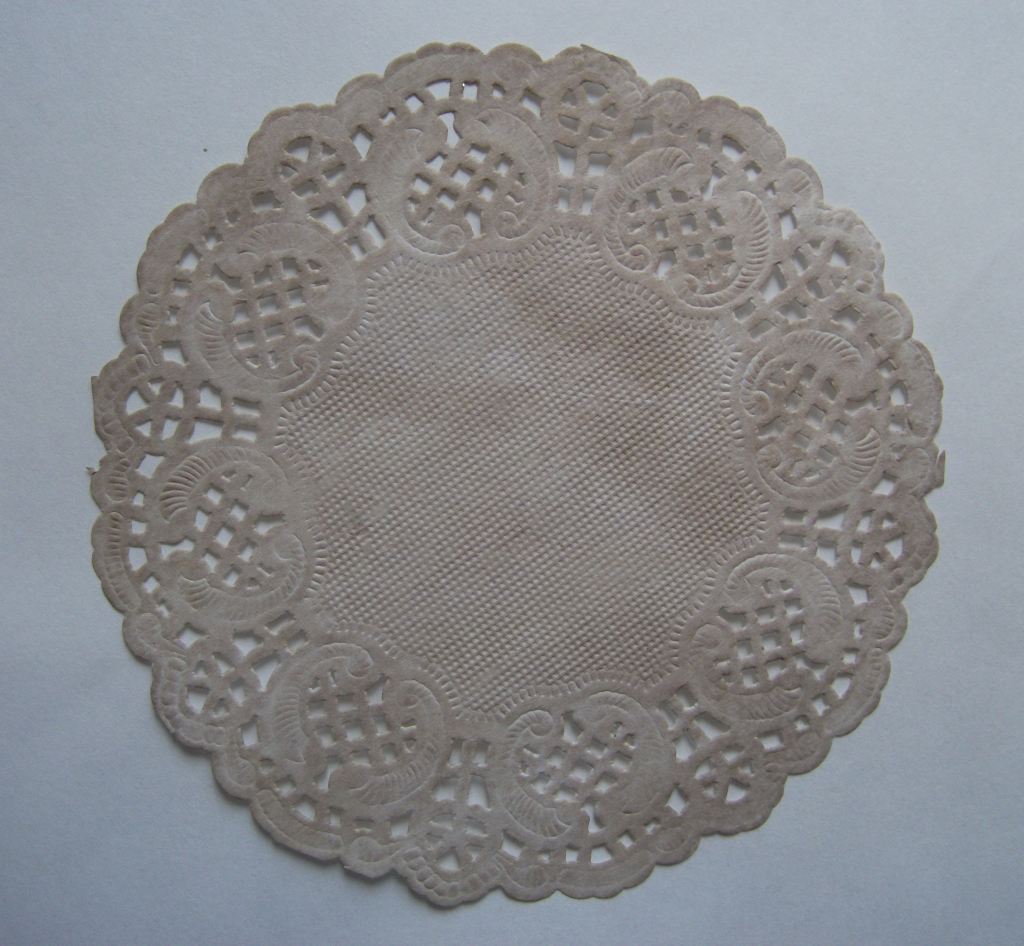
I put 2 strips of Double sided tape down the centre of the yellow strip of paper and fixed it down the centre of the brick paper. This left the edges free so that I could slide the edges of the doily halves under the edges of the paper, and stick them down with double sided tape as well.

I punched two holes at the top of the card, through all the layers, 1/3rd & 2/3rds of the way along the top. and about 1.5 cm from the top edge. These would take the ribbon to hang it up. To make the holes stronger I placed a gold eyelet in each one.

I decided where to place the 3 flowers I wanted to add, bearing in mind that I wanted to hang this up, so needed it to balance. Putting all the flowers on one side might make it tilt, as yarn flowers are heavier than paper or silk, so I decided to put them diagonally. I wanted to put leaves with each flower, so after some experimenting I decided on some more of the leaves from the old rose garland, which I have used before on other projects. So I used narrow strips of double sided tape along the centre of each leaf, from the middle of the leaf cluster to about half way along the leaf. Then I attached each group of leaves in the right position to be behind the flowers.

I then placed the first flower on the leaves, made 2 pairs of holes behind the flowers, threaded the wool strands though a wool needle and threaded each strand through a hole, in pairs, tied them off at the back and trimmed the wool short. I did this for all the flowers.

I already had the words I needed, as part of a paper pack I have for card making, so I cut the words out and stuck them onto some brown cloud shaped tags I had.

I positioned them where I wanted, moving them around until I was happy with how they looked, then sticking them down with double sided tape. I also made a hole through the card inside the hole of each tag, with a craft knife, and pushed a large white brad though each hole, opening out the prongs at the back.

I have some key charms and chose one to fix near the bottom. I used brown bakers twine, making two holes close together with a poky tool, threading the twine through a wool needle and pulling it through the card so both ends of the length of twine were at the front. I pulled one end through the loop at the top of the key, tied the twine in a knot and then in a bow, trimming off the excess.

I stamped and heat embossed a butterfly, added wire antenna and fixed this to the card with a small square brad and lifted the wings away from the card, to give a 3D effect.

I added a small wooden door, designed to be stitched down, to the paper, sticking it with double sided tape first, then stitching it with brown embroidery thread.

I threaded ribbon through the holes at the top and tied the ribbon in a knot behind the card, so it would not show.

I am entering this card in 4 online challenges.

Try It On Tuesday ‘Home Sweet Home or Where Would You Like to Live’ https://tuesdaytaggers.blogspot.com/2020/03/home-sweet-homewhere-would-you-like-to.html

As You Like It ‘Buttons or Pearls’ – Buttons, the ones with shanks on the back, make excellent middles for yarn flowers and they come in such pretty colours and designs. http://asyoulikeitchallenge.blogspot.com/2020/03/favourite-buttons-or-pearls-and-why.html

Not Just Cards ‘Anything Goes’ http://notjustcardschallenges.blogspot.com/2020/03/march-challenge.html

A Place to Start ‘Use a Household Object’ – Buttons and a doily https://hereisaplacetostart.blogspot.com/2020/03/march-2020-challenge-unconventional.html

Flower Topiary

I have seen these on Pinterest and wanted to have a go. Of course, the ones on Pinterest are done with silk or real flowers. I have not seen one with yarn flowers anywhere else.

Start by choosing a pot. I have a pink one, so will use pink and white flowers.

I had some help with the next bit. My husband said I should use a liner, rather than putting concrete straight into the nice pink pot. So he found an empty plastic tub of the right size to fit inside the pot. He put the length of dowelling into a hole in a piece of wood in the bottom of the pot, so it would stay upright while the concrete set. Then he mixed concrete with small pebbles and poured it into the tub.

Then he painted the dowelling white, so it would blend with the flowers. It needed two coats to cover properly.

We then placed the tub inside the pot and added white stones to cover the pot. You could use other toppings, so long as you cover the liner and the top of the concrete.

Then he drilled a hole in the polystyrene ball and glued it to the top of the dowelling, putting PVA glue into the hole and pushing it down firmly.

I decided to wrap ribbon in a spiral down the dowelling. I started by pinning the ribbon to the ball with a pearl headed pin.

Then I wrapped the ribbon round the dowelling in a spiral and added narrow double sided tape to the end of the ribbon. I pressed it against the dowelling and left a bit of ribbon to bury under the stones. This would keep the end secure.

Now for the flowers. First, I tied off the long strands at the back and trimmed them short, so they would not show past the edges of the flowers. They are not needed this time for attaching the flowers. Instead, I used more of the Christmas tree bauble hooks that I bought in Boyes. The short ones this time. I straightened them out, threaded one end through the centre of a flower, through the shank of the button and back through the centre of the flower. This is fiddly and sometimes I needed small pliers to pull the wire through far enough to fold flat across the back of the flower, so it would not pull out. Then I folded the remaining wire in half and used the pliers to twist it tightly together and to squash the top end.

Then I carefully pushed the wire into the polystyrene ball, starting at the bottom, using the first one to cover the end of the ribbon and the pearl headed pin.

I continued to push the flowers on to the ball all around the bottom of the ball.

I had to be very careful to make sure that the wire went fully into the polystyrene, as it is easy for it to just bend so the flower goes flat against the ball but is not secure.

For the second layer I alternated plain white flowers with the pink ones.

The third layer was all pink flowers again. Then one flower on top.

The flowers covered most of the ball, but there were a few small gaps. So I tied a few small pink bows from organza ribbon. I pushed pearl headed pins through the centre and pushed the pins into the gap in the flowers. I didn’t push the pin all the way in, but left the bow at the same level as the flowers. If needed, small beads could be added to the pin at the back of the bow, to stop the pins going in too far.

Then, as you can see in the top picture, I tied a broad white ribbon around the dowelling and tied it in a bow.

I am entering this item in 3 challenges

A Place to Start ‘Use a Household Object’ https://hereisaplacetostart.blogspot.com/2020/03/march-2020-challenge-unconventional.html

Creative Artiste Mixed Media challenge ‘Anything Mixed Media Goes’ https://creativeartistemixedmedia.blogspot.com/2020/03/welcome-to-creative-artiste-challenge-58.html

Not Just Cards challenge ‘Anything Goes’ http://notjustcardschallenges.blogspot.com/2020/03/march-challenge.html

Money Box

This is another up-cycled cardboard tub with a plastic lid, decorated in a slightly different way and turned into a money box.

This is a taller tub than the other two I have already decorated, measuring 18cm high and 10cm in diameter. This gave me the opportunity to try something I have seen on Pinterest, where the ‘outer layer’ folds back at the top to show a layer underneath.

I have used some of Debbi Moore’s Oriental Promise papers, which were free with issue 41 of her papercrafting magazine. Because the papers are A4 in size, they are not quite big enough to wrap all the way round. That doesn’t matter with this technique, as the paper doesn’t need to meet at the front. The papers are all double sided, printed with different patterns or designs on both sides. They need to be for this to work.

I used double sided tape to stick a strip of paper 2cm wide up the front of the tub and added a panel from the Oriental Promise papers at the top, centred over the strip. I had already cut paper I needed to wrap round the tub, the strip was the piece left over. I used the side that would be inside the paper, as there is a direction to the other side, which was the other way on to how I was using this strip. It won’t show much anyway, when it is finished.

I ran double sided tape around the bottom edge of the tub, from one side of the strip, round to the other side, but not across the strip. I then ran more tape up each side of the strip to the bottom of the panel and around the top edge of the tub. Because the panel has incut corners, I had to cover them with the tape.

Then I wrapped the paper around the tub, carefully keeping the edges of the paper to the top and bottom edges, starting at one side of the strip, just slightly overlapping it and round to the other side of the strip. I curled the unattached corners outwards, so some of the panel could be seen.

I used a narrow silver tape to go round the bottom edge of the paper and a pretty bunting border around the top edge.

I attached a feather across the front of the tub, using a round mini brad. I opened out the prongs, wrapped them round the middle of the feather and closed them up again. I made a hole through the tub and pushed the prongs through the hole and opened them up on the inside. It helps to have something hard to press against the prongs so that it holds firmly. I also made two pairs of holes to attach the flower to the front of the tub.

I chose a fluffy white and aquamarine flower, to co-ordinate with the papers. I used a wool needle to thread the strands on the back of the flower through one hole and back through the other, one from left to right and one from right to left. Then I tied the strands together in a secure knot and trimmed them short. I did the same with the other pair of strands.

Then I added some more embellishments from the Oriental Promise papers, bunting pieces underneath the flower and a couple of butterflies plus a couple of sparkly stickers.

Then I needed to work on the lid. I cut a slot for the money to go through, making holes at the corners first, with a poky tool, and then cutting through with a sharp craft knife. I sanded the rough edges with an emery board, to smooth them a bit.

Then I drew around the lid on the back of another piece of the Oriental Promise paper and cut out the circle of paper.

I covered the edge of the lid with silver tape, not completely, as I would be using the tape to cover the rest of the edge and the edge of the paper later.

Because my lid had a ridge all the way round the top, which would stop the paper sticking to the edge of the lid, I used a sharp craft knife to strip that off. Then I used narrow double sided tape on the top of the lid, around the edges and across the middle and round the edges of the slot, and stuck the paper circle on to the lid. Because the lid is not flat, the paper creased in a couple of places, but I wasn’t worried about that, because I was going to decorate the lid anyway, which would cover over the imperfections. First I cut through the paper down the centre of the slot and then at an angle into the corners, and folded the paper back underneath, to make a neat slot in the lid. Then I wrapped silver tape around the edge, folding it over the edge of the paper as well.

I cut out some flowers and a paper bow from the Oriental Promise papers and used them to decorate the lid, adding self adhesive gems to the centres of the flowers.

I am entering this item in the following challenges.

A Place To Start ‘Use a household object’ https://hereisaplacetostart.blogspot.com/2020/03/march-2020-challenge-unconventional.html

Moving Along With The Times ‘Anything but a Card’ http://movingalongwiththetimes.blogspot.com/2020/03/challenge-116-for-march.html

Creative Artiste Mixed Media Challenge https://creativeartistemixedmedia.blogspot.com/2020/03/welcome-to-creative-artiste-challenge-58.html

The Funkie Junkie Boutique Blog Challenge ‘Aquamarine’ http://frillyandfunkie.blogspot.com/2020/03/aquamarine.html

Try It on Tuesday ‘Try a New Technique’ https://tuesdaytaggers.blogspot.com/2020/03/try-new-technique.html

Not Just Cards ‘Anything Goes’ http://notjustcardschallenges.blogspot.com/2020/03/march-challenge.html

Dream Catcher

Another use for a part of an embroidery ring. For this I used the outside circle of a ring that measures 6 1/2 in diameter. I used the outside ring, with the adjuster on it, because that will be covered by one of the flowers. I have other plans for the plain ring. I tightened up the adjuster, to close the gap in the ring.

I had decided to wrap the ring in cream chunky wool. So I ran narrow double sided tape around the inside of the hoop.

I peeled of the backing tape, then tied the wool around the ring, tight to the support for the adjuster. I laid the end of the wool along the adhesive tape, inside the ring, and wrapped the wool around so it covered the end of the wool.

Keeping the wool wrapped close, I continued to wrap it round the ring until it was all covered, including between the adjuster supports. I then used a wool needle to thread the end of the wool under the adjoining strands, before trimming it short.

I used the instructions provided at https://public.rcas.org/hs/rchs/calendars/homework/Lists/Gabrielle%20Seeley/Attachments/144/CatchingDreams.pdf to make the web, but with some variations. I did not put the hanging loop in first, as I was not sure where to put it. Adding flowers would make a difference to how it hung, so I wanted to see where the best place was to put a loop. I did not add a bead to represent a spider, but then I am mildly arachnophobic, so I did not want to think of it as a spider’s web. I also didn’t leave a long strand attached to the middle to hang anything onto. As this is mostly going to have yarn flowers hung from it, which are heavier than feathers, it would pull the web out of shape to hang anything from the middle. I tied the end off securely and cut it short. Adding a butterfly to the web would cover that up. Other instructions are available, including You Tube videos. I didn’t get the stitches round the edge even, but for a first attempt I was quite pleased.

I had decided on cream, yellow and orange flowers, so made as many as I needed, using matching buttons in the centre of each. I wanted leaves with the ones around the hoop, so I used some fabric rose leaves from an old garland that had lost some of it’s roses. I attached one to the first flower by threading one wool strand at the back through a needle and pushing the needle through the leaf just off centre, then the other strand of that pair through the leaf off centre the other side.

I then tied this flower to the edge of the hoop, to cover the metal adjuster.

I decided. because of the weight of the adjuster, that this flower would be at the bottom of the hoop, so I added leaves to 2 more flowers and tied them to the hoop, on either side of the first flower. I tied one pair of strands above one of the hitch knots, so it could not slip down. I think the strands of chunky wool wrapped around the hoop would stop them slipping, but I wanted to be sure. This would be more important if using bare wood or anything else that might allow the flowers to slide.

I stamped and heat embossed a butterfly, cut it out, added antennae made from black coated wire and attached it to the web using a gold square mini brad. I placed it so it would cover the end of the wool. To be sure, I taped the scrap of wool to the back of the butterfly.

To hang the dreamcatcher I used a long length of chunky cream wool. I threaded it through the hoop at the top, tied it in a knot and then in a bow.

To hang more flowers from the bottom of the hoop I used more of the long Christmas tree bauble hooks. These are green plastic covered wire and I hooked three of them onto the hoop, one behind each flower, making sure the two at the sides were hooked above a hitch knot, so they could not slide down. I threaded beads onto 3 of the bauble hooks, pushing the loops at the ends closed so they did not slip off.

I hooked the lengths of wire together to make chains and tied the flowers on at a join in the chain, so that one pair of threads was tied to the bottom of a hook and the lower pair tied to the wire below. This stops the flower sliding down and helps it to hang flat. I used 4 of the bauble hooks for each chain. I pushed the loops at the ends closed, to make it more secure

I folded the end of the middle chain up behind the flower, so it was just out of sight. An alternative option would be to hang something else from it, like a tassel or feather or another set of beads on wire.

I am entering this in a number of challenges.

A Place to Start challenge requires the use of a household object https://hereisaplacetostart.blogspot.com/2020/03/march-2020-challenge-unconventional.html I think buttons would count, perhaps wool and an embroidery hoop as well.

Top Sprout
Thank you to the kind ladies at A Place To Start, for choosing my dream catcher as one of their winners

Moving Along With the Times challenge is ‘Anything but a Card’ http://movingalongwiththetimes.blogspot.com/2020/03/challenge-116-for-march.html

Creative Artiste Mixed Media Challenge is ‘Anything Mixed Media Goes’ https://creativeartistemixedmedia.blogspot.com/2020/03/welcome-to-creative-artiste-challenge-58.html

Try It On Tuesday is ‘Try a New Technique’ https://tuesdaytaggers.blogspot.com/2020/03/try-new-technique.html I have never made a dream catcher before, so making the web is my new technique.

Not Just Cards challenge is ‘Anything Goes’. http://notjustcardschallenges.blogspot.com/2020/02/february-challenge.html

An Arch Topped Window

This is an MDF window frame which I bought at a craft fair. It is approx 30 cm tall and 16 cm across.

Because it is MDF, I decided to paint it. I used Anita’s acrylic paint called dusty green, which I watered down and painted on thinly, so that the surface underneath shows through. This is to give a vintage look to it, you don’t have to do this. I then lightly sanded the surface and gave it a couple of coats of clear varnish.

I then cut three pieces of fairly stiff wide lace, about 7 in or 18 cm.

I tied these onto the window frame where I was also going to place the flowers. I would like to be able to hang this window, so I needed to place the flowers where they would balance the window, not all on one side, which would make it tip.

I then tied the flowers on, wrapping the strands of wool around the cross pieces and knotting securely. Then I trimmed the wool strands, so they would not show.

I wanted to add some leaves, so I punched some and marked the veins on with an embossing tool. I made a small hole in each leaf and threaded them onto green wire, in threes, folding the wire and pressing it tight with small pliers.

I pushed the wire down behind the flowers but couldn’t make it secure enough, so I used a small dot of wet glue (actually glossy accents, as it is easy to control, so you only get a small amount) on the back of the top leaf and pressed it down to the frame. I then used double sided foam tape to attach a butterfly. I tried glue, but the underside of the butterfly’s body is glittered and glue wouldn’t work.

I decided this still wasn’t enough decoration, so I added some glittered flowers, also using foam tape to stick them on. I have found that these don’t stick too well, long term, so I needed to attach them more firmly. The flowers I was using were on wire, so when I cut the wire short I left a short length still attached. I then tied the wire to the frame using green sewing thread.

I threaded ribbon through the top and added a couple more glittered flowers before hanging it up.

I am entering this window in the Not Just Cards challenge for February, which is ‘Anything Goes’, at http://notjustcardschallenges.blogspot.com/2020/02/february-challenge.html

I am also entering it in the Funkie Junkie Boutique challenge ‘Leap into the Odd’ http://frillyandfunkie.blogspot.com/2020/02/leap-into-odd.html. I think this is an odd thing to do with the window shape anyway, but also an odd colour to paint a window frame.

Another challenge I am entering is the Moving Along with the Times challenge for March ‘Anything but a Card’ http://movingalongwiththetimes.blogspot.com/